DIY PUMPKITTEN SQUAD

Mmm, there’s nothing like prancing around a pumpkin patch IN 90-DEGREE WEATHER.

Ugh. Fall, it’s normally not hard to love you, so why. WHY???

Anyway – it’s crazy to think that Halloween is already just nine short days away. And if that also means you’re running out of excuses to continue putting off that annual love/hate relationship you have with carving pumpkins, then do we have a fix for you!

Now, don’t get me wrong. Pumpkin carving is cool. I mean, I never actually did it for real for real until just a few years ago, but at the same time…there’s no denying the mess. Or the smell. Or how it feels like they’ve already rotted before you even ~really~ have time to enjoy them. 

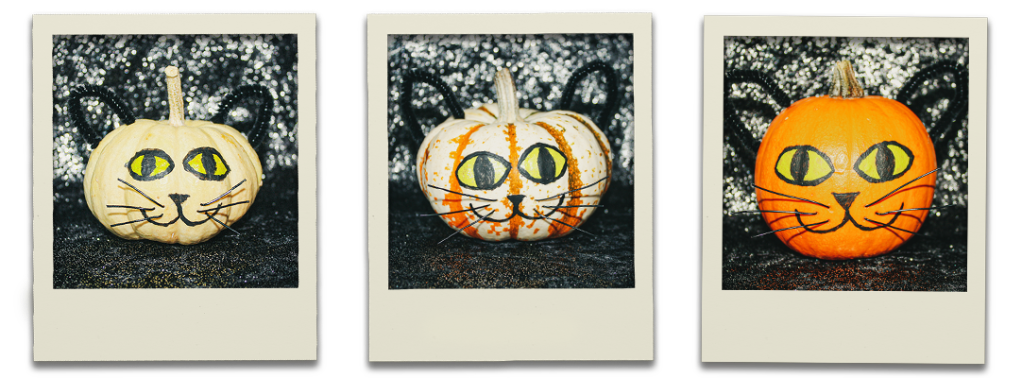
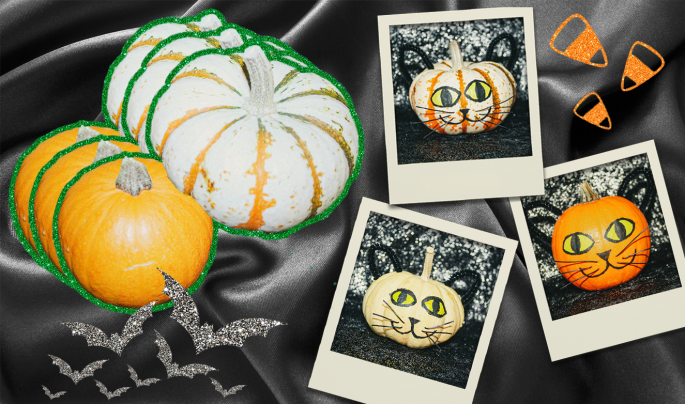
So from all of that we came up with a solution. Something cuter, cleaner & that can still be just as creepy if you get the beady eyes right: PUMPKITTENS!

A feline fierce take on classic jack-o-lantern vibes, mini pumpkitten squads are the answer to our pleas of ornamented squash vitality. Since we’re painting instead of cutting into the pumpkins, they’re guaranteed to last loads longer. PLUS, unless you’re a regular Michael Myers with knives, this method provides way more creative control with just as much customizable potential, too!

Seriously, it wasn’t until just YESTERDAY that we finally threw away the lone survivor of last year’s crop. So especially if you’re one to consider Halloween decor as just decor, then this project is totally up your alley.

// WHAT YOU NEED //

+ Mini pumpkins

+ All-purpose craft paint (black & green)

+ A very thin paintbrush 

+ A pencil 

+ Black pipe cleaners (2 per pumpkin; cut into 3.5-inch pieces)

+ Flexible black craft/jewelry wire (6 per pumpkin; cut into 1.5- to 2-inch pieces)

// STEPS //

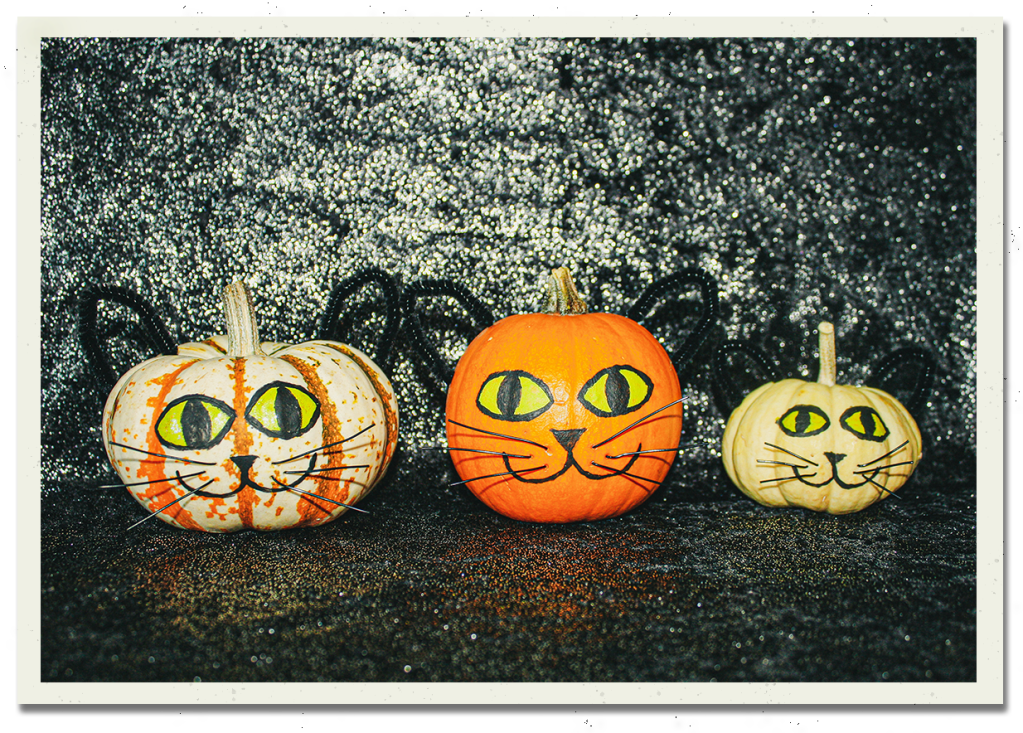
++ Use the pencil to lightly sketch an outline of the face, including the eyes, nose & mouth.

++ With an exceptionally steady hand, first paint the green portion of the eyes. Let dry & apply a second coat.

++ Wash your brush & then paint the black portion of the eyes and outline the nose/mouth. Let dry.

++ Bend your pipe cleaners into the shape of a cat’s ear & stick them into the top of the pumpkin in an applicable, ear-like position.

++ Finally, stick half of the wire pieces on each side of the mouth & fan them out to resemble whiskers.

(NOTE: if your pumpkin(s) are unusually hard, you might need to use a toothpick, psycho ice pick or any other sharpish object to make a small, prelim puncture before sticking your pipe cleaners and/or wire into place)

And there you have it! Adorably festive (& somewhat everlasting) pumpkittens ready to usher in yet another fabulously spooky season.

Let us know how they turn out for you!

xxAA

FALL’S MOST UNEXPECTED ACCESSORY: DIY GLAM BANDANAS

Ah, bandanas. Something you probably haven’t thought about since that godawful country western-themed dance in middle school – unless you’re a roadie for The Grateful Dead.

BUT now that fall temps are starting to arrive and we can actually stand to wear something around our necks without dripping in sweat, we’re proud to introduce: the glam-dana!

A great way to transition into fall, this edgy twist on the classic kerchief might just be our new obsession. And for good reason! After all…

–Basic bandanas are cheap as hell. Like, 99 cents cheap.

–They come in a surprisingly huge array of colors & prints.

–The fabric is super easy to work with (& also wash).

–You can style them in so many different ways (I’m talking from tanks to turtlenecks).

–AND they’re totally customizable to whatever vibe you’re feeling – and/or supplies you have laying around. 

Seriously, beads, trim, studs, spikes, buttons, sequins – even dye or paint if you really want to get creative. It’s one of those projects that you can invest however much (or little) time you’d like, plus truly make all your own.

So let’s dive in!

// WHAT YOU NEED //

+ A bandana

+ Bead needle & thread (double layered & knotted at the end)

+ Regular needle & thread (double layered & knotted at the end)

+ Beads (I used seed)

+ Fringe

+ Your choice of chain & studs (or whatever else you want to use for embellishment)

// STEPS //

++ First things first: rescue that bandana with an iron. You won’t get ~all~ of the creases out, but give it a valiant effort.

++ Fold the bandana in half diagonally and choose which side you want to be your main (luckily we only have to decorate the half that’s going to show).

BEADING

++ If you want to bead, that’s the first detail you should knock out (if not, just skip to the next section).

++ Once you figure out which areas you want to accent with beads, take your threaded bead needle and make your first stitch. Pull the needle though the fabric so the knot is on the non-visible side and sew a few tiny stitches, just to secure the thread. 

++ Add your beads two to three at a time onto the needle and pull them all the way down the thread so that they’re touching the fabric. Lay them down along where you want them to sit, and pull the needle down through the fabric right after the last bead to sew them into place.

++ Pull your needle back up about two to three bead’s length away from the last sewn-in bead (same premise as a back stitch), thread more beads onto the needle, put your needle back up against the last sewn-in bead and pull it down through the fabric. At this point, you should see all of the sewn beads starting to form a line.

++ Stitch by stitch, continue the beaded detail. Your S.O. might look at you like you’re a psycho for wanting to bead all of those leopard spots – but it’s totally worth it! I promise. 

OTHER EMBELLISHING

++ Measure & cut enough fringe to line the edges. Sew it on by hand or with a machine.

++ Measure, cut & hand-sew any additional decorative trim, like curb chain. 

++ Finish attaching any other final details, such as light-weight studs — and BAM! There you have a beautifully glam bandana.

// PROTIPS //

++ If you choose to bead, note that beading needles and regular sewing needles are different. Beading needles are much longer and thinner in order to go through the teeny tiny seed beads – plus the world’s worst to thread. You also can’t use thicker thread with beading needles because it won’t feed through the eye, so go with one that’s thin yet durable.

++ When beading straighter designs, you can sew more beads at a time. For curvier details that need greater accuracy (i.e. our beautiful leopard spots) you have to stick with one to three beads at a time. 

++ It’s easiest to dump your beads into a shallow container and stick your needle into the pile to catch them instead of hand-threading each bead onto the needle.

++ When hand sewing any other details onto your presentation side of the bandana, also be careful not to accidentally sew the two sides together! Speaking as someone who this mistake the first time…ugh.

Infinity scarves, don’t say we didn’t warn you. Because this chic, post-summer staple is most def here to stay.

Let us know how they turn out for you!

xxAA

4 HALLOWEEN DECOR TRENDS YOU NEVER WOULD’VE GUESSED

If you didn’t get the memo, we’re only 51 DAYS AWAY from Halloween.

I know, I know – it’s hard to believe when it still feels like the surface of the sun outside. But once the networks start promoting their October lineups, dejected pool noodles get marked for closeout and the PSL debuts before school has a chance to start, then you know it’s about to get real.

And if you’re spooky season-obsessed, then you also know it’s time to sound the most important alarm of all: HALLOWEEN MERCH HAS ARRIVED! 

Although, this year? It may not be quite what you’re expecting.

Of course you have the usual suspects: pumpkins, bats, skulls…you know. But this time around it seems retailers nationwide are aiming to keep things fresh as well as chilling. You’ve probably heard the buzz behind TJ’s new yogi skeleton air plants or the surge in tropical Halloween aesthetics (don’t worry, it’s way more chic than you’d assume). However, if you think that’s as crazy as things are getting this year – think again.

Now don’t get me wrong, we’re all about it! The contrast of cute & creepy is always a win. And the degree that stores have stepped up their holiday decor game in recent decades has been pretty revolutionary. Don’t lie: we all know the kinds of decorations our grandmas have stockpiled in their sheds for the last 50 years. So decor that’s both seasonal AND shows off our personal styles? Can’t beat it.

So to kick off our prep for the superbly spooky season, let’s take a look at some of this year’s biggest (& somewhat surprising) decor themes – soon to hit a shelf near you. 

// GLAM //

OK, so glam-o-ween is one that’s actually been around for a while. But how could we resist leaving SUCH a great thing off a list like this? Mercury glass, jewels, metallics and more—what’s seriously not to love about elevating an aesthetic to make it as dark & dreamy, yet refined as possible.

++ Skull Decanter | Williams-Sonoma

++ Mercury Glass Skull | Target

++ Jeweled Metal Fly Ornaments | World Market

++ Black Glass Goblet | At Home

++ Disco Ball Skull | Target

++ Marbled Pumpkin Set | Joann

++ Halloween Feather Wreath | Wayfair

++ Full-Sized, Distressed Gold Skeleton | Grandin Road

// CUTE & KITSCHY //

Another thing about Halloween is that it’s equal parts fun for adults and kids alike. So it only makes sense that the daily doses of cute you currently see in every other facet of retail on the planet (looking @ u sloths, llamas and unicorns) would make their way into these seasonal goods as well. 

& if you don’t believe me, just go to your local grocery store and tell me there isn’t a llama sitting in the Halloween section right now.

++ Halloween Llama | Pier 1

++ Fairy Skeleton Ornament | Joann

++ Halloween Unicorn Cookies | Williams-Sonoma (OK not decor, but so cute)

++ Pumpkin Succulent | Target

++ Unicorn Skeleton | World Market

++ Halloween Teapot | Pier 1

++ Halloween Sloth | Target

// OLD WORLD / STEAMPUNK //

In addition to love, vampires and Nikki Sixx’s heart, steampunk never dies, either. A case that’s especially true when it comes to aesthetics of Halloween! From Victorian Goth vibes to old world treasures, this year has brought a healthy host of products that celebrates the timeless look, no doubt.

++ Spooky Record Player | Wayfair

++ Poisons & Potions Wagon | Target

++ Skeleton Carriage | Michaels

++ Spooky Cameras | World Market

++ Antique Phone | Grandin Road

++ Pumpkin Coach | Wayfair

++ Spooky Film Projector | World Market

// RETRO //

As we’ve seen with every recent movie and TV reboot: nostalgia is clearly in. And apparently the same goes for Halloween. Although tons of stores roll out their own spins on vintage products, the latter half of the twentieth century has obviously been a particularly popular source of inspiration.

Besides, let’s be real – those life-sized, animatronic zombie props are basically just Big Mouth Billy Basses in disguise.

++ Vintage Halloween Radio | Grandin Road

++ Skeleton Yard Flamingos | Amazon

++ Moon Dream Catcher | At Home

++ Skull Shag Rug | Pier 1

++ Neon Flying Witch Sign | Target

What other fun finds have you spotted this year?

xxAA

WHITE CLAW BLACKBERRY-LIME SCONES

Myyyyyyyyyy WHITE CLAW BRINGS ALL THE BOYS TO THE YARD!

Woah…simmering down. What I actually meant to say is happy September, my party people! 

It’s crazy to think that our fun-in-the-sun weather has already come and gone. Though with that it’s only natural we say sayonara to summer, and most importantly, usher in the fall-filled, only-55-days-until-Halloween kind of vibes.

But since we’ll all be wishing for warmer temps come the onslaught of snow (& for the West Coast- anything below 70 degrees) soon enough, it’s also fair we give this sunny season the worthy farewell it deserves. Which means concocting something fresh out of a British millennial’s dreams, obviously.

That’s right, I’m talking about White Claw SCONES!

In addition to all the seltzer-hounding bros out there, inspiration for this recipe came from the patron saint of sandwich finesse himself: Chef Jeff Mauro! One morning while watching my lifeblood (A.K.A. Food Network’s The Kitchen), Jeff totally dropped the mic when he intro’ed the concept of scones made with Prosecco. Revolutionary – I know, I know.

So in the shadows of this year’s scorching #HotGirlSummer, the idea came to me like a prophecy. Instead of stopping at just Prosecco, why not go for the gold—the WHITE CLAW gold. 

After all, there ain’t no laws when you’re drinking claws, right? (Edit: no)

(There are definitely still laws)

Jokes aside, this combo is fire. Seriously, 7-Up biscuits are a totally fine start; but why not go even further with replacing some of our baking liquid with the crisp, bubbly goodness the world has randomly just now discovered? 

So whether it’s a DIY brunch or something to tag-team with your morning coffee, you’ll find these flaky babies are about to become your new go-to treat.

// DIRECTIONS //

++ Preheat your oven to 400℉ to make sure it’s nice and hot, then line a baking sheet with parchment paper and set it to the side.

++ Place the cubed butter into the freezer for a few minutes before you start the dough. (Just like pastry dough, keeping your ingredients super cold will make for exceptionally flaky scones – I even popped my White Claw in the freezer, too)

++ Meanwhile, chop up your blackberries and leave no piece of lime unzested.

++ In a large mixing bowl, combine the flour, sugar, salt and baking powder and mix with a wooden spoon.

++ Remove the chilled butter from the freezer and add it to the dry ingredients. Cut the butter into the dry mix using a pastry blender (or two forks) until it’s about the size of a peas.

++ In a separate bowl, add the buttermilk, White Claw, vanilla extract and splash of heavy cream (only if you already have it) and whisk together. Then, ((gradually)) add the wet ingredients to the dry. Add the chopped blackberries, lime zest, splash of lime juice and pinch of white pepper, then ((carefully)) fold it all in. 

++ Your dough should quickly start to come together, but if you find it to be too dry, add additional touches of White Claw. BUT ALSO FIRST PLEASE NOTE this is a critical step—you do not, I repeat, DO NOT want to overwork your dough or add too much liquid. Scone dough should be on the drier side, rather than wet and sticky. 

((For this round, I accidentally got heavy handed with the additional White Claw. But I promise, it wasn’t on purpose – so I won’t tell if you don’t))

++ Once the dough is an optimum consistency, plop it onto a lightly floured cutting board and delicately roll it out into a circle. About 1 to 1.5 inches thick. Cut into 8 triangles and place each on the parchment-lined baking sheet.

++ Bake for 16 to 18 minutes until delectably golden brown. Then remove and let cool on a wire rack for a few minutes before enveloping.

Now, the other best part of this recipe is that you can also completely customize it to your favorite flavor!  I’m thinking black cherry/dark chocolate & vanilla, mango/white chocolate & mint, raspberry/lemon & lavender and grapefruit/ginger & a pinch of cayenne. The possibilities are truly endless.

(Just never mind the current nationwide shortage)

But either way, this is where we end things in the only way that feels right: Yee Claw!

Enjoy xxAA